CRTE REVIEW
Why CRTE?
The Certified Red Team Expert (CRTE) is a well-known certification with a solid reputation in the infosec community. It’s well considered to be one of the most complete and up-to-date hands-on trainings focused on Active Directory vulnerabilities and how to exploit them.
That being said, that wasn’t enough for me to pursue it. First, I evaluated the course content carefully and how well it aligned with my own goals. I didn’t want to spend my time chasing a cert just to add a line to my resume. My main goal was to level up my understanding of how Active Directory works under the hood, and the kinds of misconfigurations I might encounter in the wild. I was also looking for a hands-on learning experience, as in my opinion, purely theoretical knowledge often falls short when it comes time to apply it to real-world problems.
With that in mind, CRTE seemed like the perfect choice.
While I was researching it, I noticed there weren’t that many in-depth reviews from students who had already taken and passed the exam, so I decided that I would share my own experience once I was done. And here we are :)
Resources
To walk you through my learning experience, I’ll break down the main resources CRTE provides and how each one helped me prepare for the exam.
Videos
Learning Objectives Videos
In these videos Nikhil explains each topic in depth and then walks through the associated lab exercises. They’re nicely segmented by topic, so it’s easy to revisit any concepts you didn’t fully grasp the first time.
Nikhil does a great job not only explaining the vulnerabilities and misconfigurations, but also diving into why they exist and what parts of Active Directory they affect. It’s not just a checklist of “do this, then this”, you actually learn how things work and why they work that way, which really helps the knowledge stick.
Walkthrough Videos
In addition to the Learning Objective videos, there are also standalone walkthroughs of the lab exercises. These are more direct and to-the-point, and super helpful when you’re practicing in the lab and just need a quick reference on how to approach something.
Documentation
The course provides detailed docs covering:
- Lab architecture and design
- Lab access and setup
- Lab exercises (with and without C2)
- Learning objectives
Everything is well-documented and easy to follow.
Lab
This is arguably the best part of the course. The lab lets you simulate all the scenarios covered in the learning material, and then go beyond them. You can experiment with new tools, different techniques, and dig into side quests, thanks to how stable and complex the lab environment is.
Also, shout out to the support team. They really had to put up with me and a lot of my quetsions. Every time they responded quickly and were genuinely helpful. I had lab access for 90 days, which was more than enough.
Tools
The course includes all the tools used in the training sessions. Most of what you’ll need is covered here. Some of them are custom or modified versions that bypass Microsoft Defender or other defense mechanisms. Even though evasion isn’t the main goal of this course (they have CETP for that), Nikhil still explains how and why these tools work the way they do.
So, even if you’re not diving deep into AV/EDR evasion during the course, you still come away with a solid understanding of what to watch out for when facing defensive setups in real-life scenarios.
Methodology
Here’s the approach I followed to make the most of the course content:
1. Learning Objective Videos
I started by watching all the videos and taking detailed notes about attacks, tools, possible issues, workarounds, etc. Pretty much everything that I though would be of use while facing the exam. Nikhil solves the lab exercises at the end of each lesson, so I paused the videos before the solutions and tried to solve them myself first. If I got stuck, I knew which areas I needed to reinforce in my notes. This step took a few weeks since I was doing it in my spare time. However, I feel like it was worth it.
2. Lab Exercises
Even though I had already attempted them alongside the videos, once I finished all the content, I went back and re-did the exercises as if simulating the exam. Enough time had passed that I didn’t remember all the details, but I still retained the key concepts and attack paths.
3. Lab Exercises with Sliver C2
At some point, a colleague mentioned that pivoting and C2 usage were expected during the exam. While not mentioned in the videos, the documentation does cover how to use Sliver C2 for the lab exercises. I hadn’t used Sliver before, so I used the opportunity to learn. I practiced by trying to recreate the more advanced attack chains in the lab using implants, pivoting between compromised systems, etc.
By the end of this step, I felt confident and ready, so I went for the exam.
Exam experience
Structure
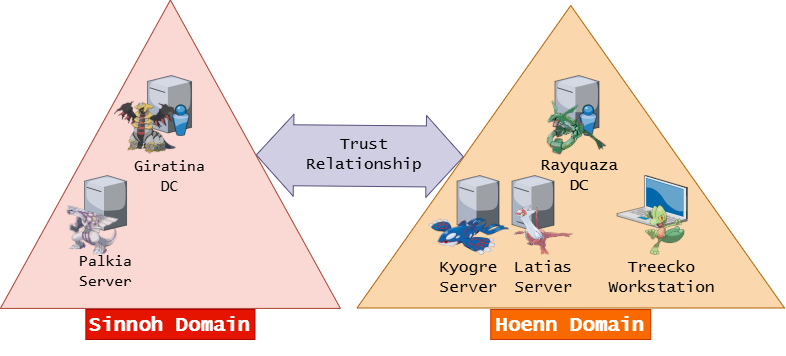
The lab environment for the exam was structured something like this:
Hoenn Domain
- Treecko Workstation (starting student’s vm)
- Latias Server
- Kyogre Server
- Rayquaza Domain Controller
Sinnoh Domain
- Palkia Server
- Giratina Domain Controller
Overview
After clicking “Start Exam,” I received credentials for Treecko Workstation, which gave me unprivileged access to the machine. From there, I enumerated the Hoenn domain using PowerView and the PowerShell AD module. That led to me eventually exploiting misconfigured ACLs and finding cached credentials that got me into Latias Server.
Latias didn’t give me full control over Hoenn, but it did have visibility into the Sinnoh domain, unlike Treecko. By abusing Foreign Security Principals (FSP) and a misconfigured MSSQL instance, I gained a foothold in Palkia Server (in Sinnoh) and repeated the enumeration process, this time focusing on the new domain.
Based on the insight obtained during this second round of enumeration, I abused delegations, which led me to compromise Giratina DC, and thus owning Sinnoh.
Still missing control over Hoenn, I doubled back and dug deeper into ACLs affecting Kyogre Server and Rayquaza DC. That gave me the final pieces I needed to compromise the Hoenn DC. At that point, I had full access to both domains, and the exam was done.
Total time: ~28 hours.
Tips
Here are a few things I’d tell a friend to do if they were prepping for CRTE:
-
Preconfigure your tools: If you plan to use something like BloodHound, set it up and test it on your attack box ahead of time.
-
Get comfortable with pivoting and C2: These skills are assumed, not optional.
-
Understand the why: The exam isn’t about memorizing steps. You’ll need to adapt the concepts to new situations. For example, MSSQL attacks aren’t deeply covered in the course, but if you explore tools like PowerUpSQL and read a bit more on your own, you’ll be way more prepared.
Conclusion
If you already have a basic understanding of Active Directory and some background in offensive security, CRTE is an awesome learning experience. I had a blast going through the material and playing in the lab, and I’d definitely recommend it.
For the price, it’s more than fair. There are much more expensive certs out there with outdated content whose team has little to no concern for its students. That’s not the case here, as both Nikhil and the support team are fully invested in making sure students have a solid, up-to-date experience.